Monday, 2 September 2019

Inset Floral Birthday Card

I made this card for my lovely niece using the Simon Says Stamp Cosmos Stem Wafer Thin Die from the Believe in You collection.  The flowers are inset after being coloured with Copic markers on Neenah Solar White 110 lb. cardstock.  The card base, sentiment , label and ribbon are from Stampin' Up!


This was a really fun card to colour and to put together.  Hope you like it too!


Saturday, 17 November 2018

Clean and Simple Holiday Online Card Class

This is a card that I designed for one of the card making classes at the Georgian Bay Cancer Support Centre.  It features layered die-cut snowflakes from the Stampin' Up Snowfall Thinlits set mounted on an embossed white background.  I used the de-bossed side of the cardstock that I created with the Swirls and Curls Textured Impressions Embossing Folder.  The silver frame was die cut with the Pierced Rectangle Frames by My Favorite Things.


This second card features snowflakes cut with the Tim Holtz Sizzix Swirly Snowflake collection.  I layered some of the snowflakes and left some flat to create more texture.  The sentiment is from the Simon Says Stamp Merry and Bright clear stamp set.  The fun part of this card comes when you open it to reveal the shadow box scene inside.  The winter scene was made with Lawn Fawn stamps from several different sets.  The scene is framed with more of the Tim Holtz snowflakes.


Hope you like them!


Thursday, 4 October 2018

Monochromatic Colour Scheme

This is a project I created for a friend.  It will hopefully be inspirational to the recipient who has recently been diagnosed with cancer.  I was going for a soft, restful monochromatic effect.  The background was watercoloured on a sheet of Strathmore Mixed Media paper.  Before applying the watercolour to the paper, I spattered it with Pebeo masking fluid. Once the watercolour was completely dry, I removed the masking fluid dots and then stenciled the tree ring image with an Altenew stencil and a sponge dauber.  I used Frayed Burlap Distress Oxide Ink to ink the stenciled image.  I stamped and embossed the sentiment using a stamp from Woodware Craft Collection Clear Magic entitled "Always Remember" with SU copper embossing powder.  I decided that I wanted to add some ink spatters, so I covered the writing with a simple paper mask.  I used Vintage Photo Distress Oxide Ink and US Art Quest MicaColor copper paint to add the spattering.  The skeleton leaves were stamped with Versamark and embossed with stamps from the Stampin' Up "Rooted in Nature" using SU copper embossing powder on Neenah Desert Storm 100 lb. paper.  After fussy cutting the leaves, I created some dimension by manipulating the paper with my fingers.  The leaves were adhered to the background using liquid glue and dimensional tape.  I added a May Arts Jute Twine bow as a finishing touch.  I trimmed the finished piece to fit in a 5" x 7" frame.


Thursday, 3 November 2016

30 Day Colouring Challenge

For anyone who loves to colour, you really should check out Kathy Racoosin's 30 Day Coloring Challenge at her blog, The Daily Marker.  You can join in and post pictures of whatever project you are busy colouring, but you can also get all kinds of inspiration by checking out what other people are doing.  I'm showing a card I made using the Lawn Fawn "Sprinkled with Joy" stamp and die sets.  I actually cased a card made by Nichol Spohr using the same sets.  You can check out her card and video here.  I stamped the components with My Favorite Things Black Licorice Hybrid ink and coloured them with Copic markers.  This was such a fun card to make. 


Probably the most endearing feature of the card is that the little oven door opens to reveal the cookie sheet holding tiny cookie images.  I used a piece of acetate to form the window of the oven door and a strip of silver foil cardstock to make the handle.  I just love the die that cuts the tiny dish towel with its little cross-stitch detail.  Here's a closer look:


I also used stamps from the set to create the greeting inside the card:

 
 Lots of fun!  Hope you like it too!


Thursday, 28 July 2016

Crazy for Hydrangeas

I simply love hydrangeas.  My garden is full of them, but unfortunately, we had a very mild winter last year with an extensive thaw in January.  Hydrangeas don't take kindly to being warmed up and chilled again, so I don't have many blooms this year.  When I first saw this Mondo Hydrangea stamp, which was designed by Julie Ebersole for Essentials by Ellen over at Ellen Hutson, I just had to have it!  Although I bought it quite awhile ago, I'm just getting around to using it now.

I used my Misti to double stamp the beautiful bloom and leaf with Versamark, (I inked and stamped twice in the same spot to get a well defined lines.) and then embossed it with white Tsukineko embossing powder on 100 lb. Bristol paper.  This gave it nice bold white lines, perfect for watercolouring.  Although Bristol paper doesn't handle water as well as actual watercolour paper, it is nice and smooth and therefore takes stamping very well.  It does allow colour to move the way that watercolour paper does, so as long as you avoid "scrubbing" at the surface with your brush, it works well for the technique I wanted to use for this project.


I used a combination of Distress markers and Distress inks applied to an acrylic block and picked up with my brush to watercolour the petals and leaf.  I wanted to achieve a sort of "pink to blue" transition over the flower head, so this worked well.  I used Shaded Lilac and Picked Raspberry to colour the petals in varying degrees of intensity and mixing to get the look I wanted.  I used Fossilized Amber for the centres of the blooms and Peeled Paint for the stems and leaf.  When I finished painting the flower, I used a very watery wash of Faded Jeans to fill the background.  When the paper was completely dry, I stamped the sentiment in Jet Black Archival Ink.  I mounted the finished watercolour piece on a card base of Stampin' Up Pear Pizazz.  I'm quite pleased with the way it turned out and I think I could use this particular card for a number of different occasions by simply choosing an appropriate sentiment for the inside greeting, or by writing in something personal to suit the event.

Until next time,
Carol

Friday, 17 June 2016

Baby Congrats

It is always a joy to congratulate friends and relatives who have had a new baby join their family.  It is also so much fun to create a card to celebrate the occasion.  Here is a card that I made recently:


I used a stamp from the Simon Says Stamp "Congratulations" stamp set that was a part of the May 2015 card kit to stamp and emboss the greeting in silver.  The adorable animal images are from the Stampin' Up "Zoo Babies" stamp set.  I just love these critters!  Fun to stamp, fussy cut and layer.  Hope you like the result.

Until next time,


Friday, 1 January 2016

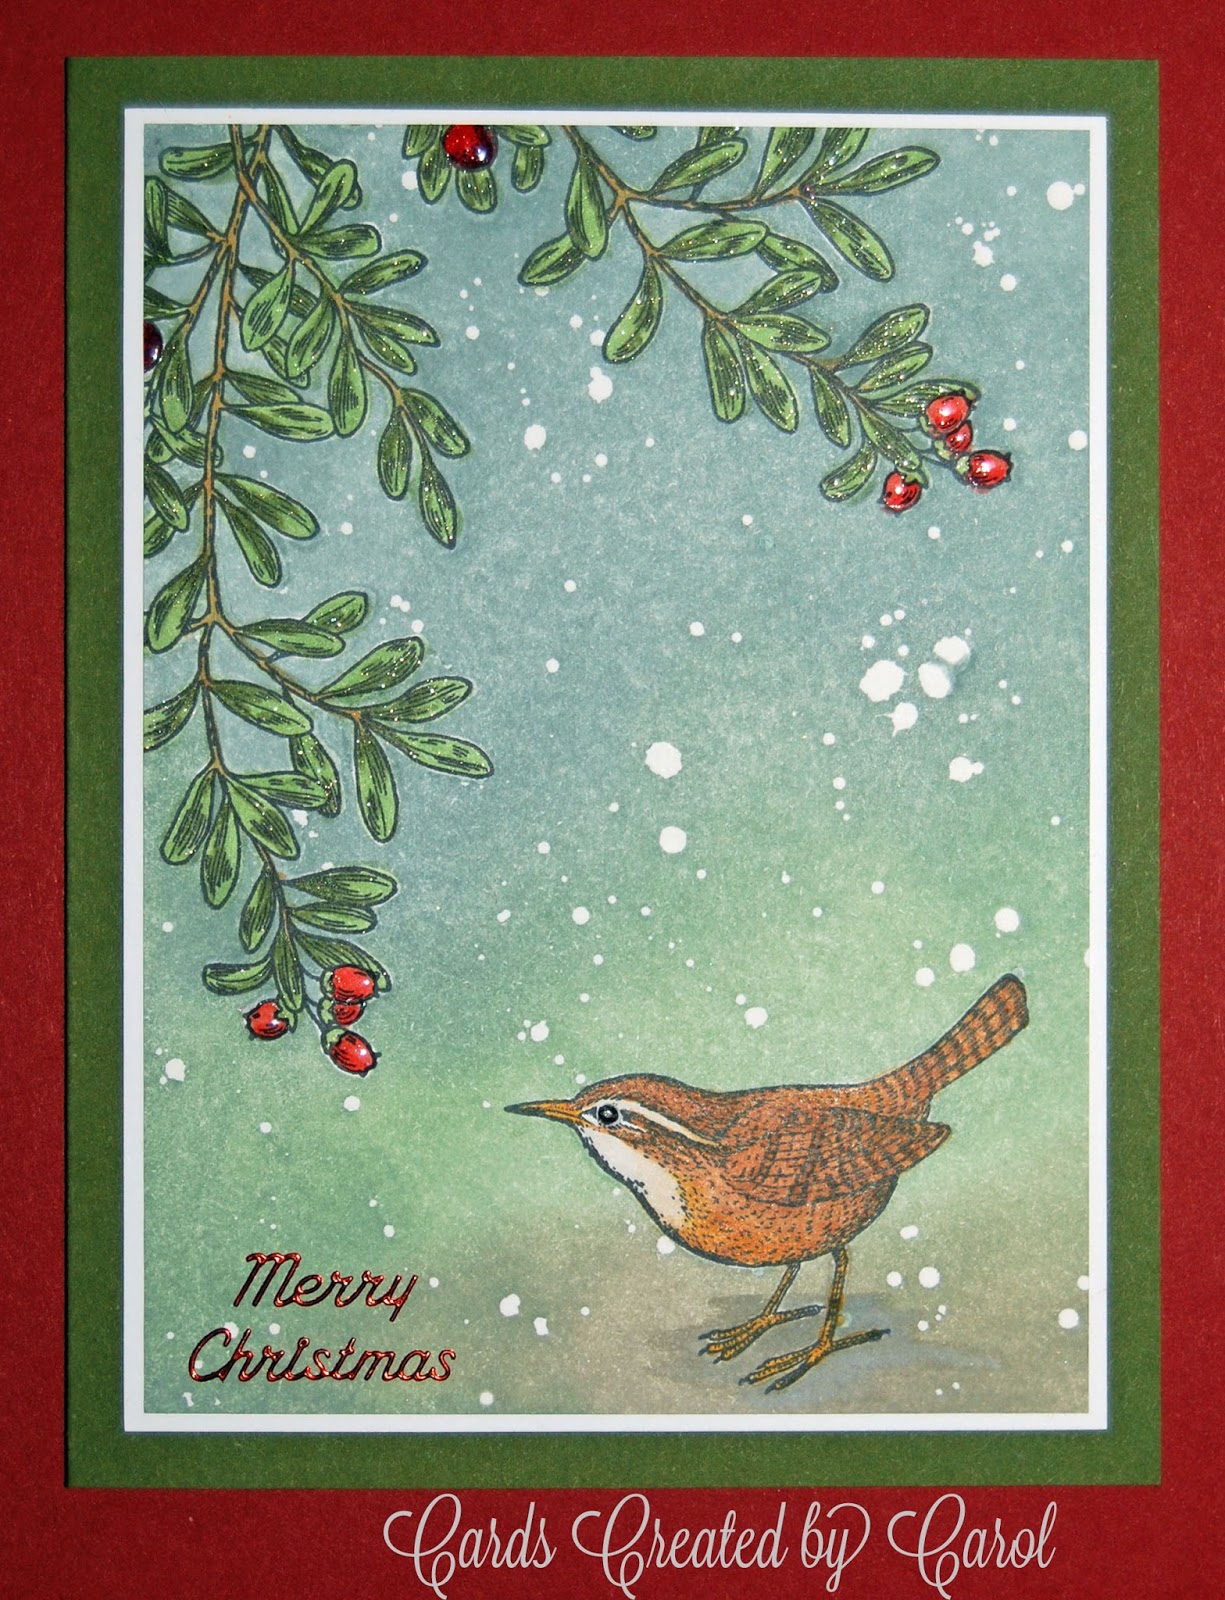
Christmas Cards 2015

As a new year has just begun, I am starting 2016 with the best of intentions to post on my blog more frequently.  Today, I've decided to post a few of my favourite Christmas cards that I sent out this year.  Hope you like them.

   
This card was stamped and embossed with black embossing powder, then
coloured with Inktense and Watercolour Pencils and a waterbrush.  I added
a few metallic details using US Artquest Mica Metallic Watercolor Paint.


This card took quite a few steps to achieve the effect I was hoping to
accomplish. I first stamped the bird and branches with Jet Black Archival Ink.
Then I stamped, cut out and applied masks over the images.  Next I
spattered the paper with liquid frisket.  Once it had dried, I applied
Distress Inks using a mini blending tool.  When I was happy with the
colour, I removed the frisket and the masks.  I coloured the bird and
the branches with Copic markers and added a shadow under the bird. 
Final touches included a Metallic Starform "Merry Christmas" greeting
and some Ranger Glossy Accents on the bird's eye and on the berries.


I had to show the inside of this lever card.  It provided quite an unexpected
surprise when anyone opened it!  I love the fact that this has very little bulk
for an interactive card.  The little winter scene was stamped with Onyx
Black Versafine ink on pale blue cardstock and coloured with Prismacolor
Premier Pencil Crayons.  I love this stamp set by Stampin' Up.
It has so many fun elements that can be used to create a scene.
The tiny cardinals, the car and the Christmas tree were fussy cut and
popped up with dimensional tape.  I added a final touch by coating
all of the car windows with Glossy Accents.


Last, but not least, are a couple of detailed cards constructed from a variety
of die cuts and punched paper pieces.  The tree base, candy canes, gifts,
and gingerbread men were cut using Impression Obsession's Bare
Christmas Tree set.  I made a tree skirt from a small piece of red felt and
tied tiny bows for the parcels from string. The foliage for the tree was
cut using a Martha Stewart punch and layered to create a full tree.
  The cat was also cut using an I.O. die and the window was cut using
the Memory Box Small Madison Window die.  I added a winter scene
to be seen through the acetate window, which I printed on my printer. 
The tiny mouse was freehand fussy cut.  I added a tiny silver tail using thread.


This final card was constructed from the Impression Obsession Fireplace
set.  I added a brick background to the interior of the fireplace
using patterned paper.  The cats were cut from the I.O. Cat set and
coloured with Copic markers.  The ovals for the picture over the
mantelpiece were cut using a Nellie Snellen set of dies.  The
greeting was stamped and embossed with Ranger Regular Gold
embossing powder.  I added some Diamond Stickles to the fire to
make it sparkle and some Stardust Stickles to the foliage on the garland. 
Although it is difficult to see from the picture, this card has many
dimensional details and really was quite spectacular in person.

I hope you enjoyed seeing a few on my 2015 Christmas cards.  I made about 40 cards this year, with very few duplicate designs.  I thoroughly love making Christmas cards and hated to put away my Christmas collection of stamps and dies.  I'm sure I'll have lots of new ideas by the time Christmas 2016 rolls around.

Best wishes for a happy, healthy and prosperous New Year!


Tuesday, 28 July 2015

Background Check: Day 1

I'm busy taking part in yet another wonderful Online Card Class.  The latest series of classes is called, "Background Check" and as you may have guessed, it is all about creating wonderful backgrounds for your cards.  One of the techniques that was addressed today was colour blending.  Here is my creation:


Obviously, I have already started making my 2015 Christmas cards.  This card was created by colour blending with Ranger Distress Inks and round Tim Holtz blending tools.  Before adding colour, I heat embossed the Merry Christmas greeting using Tsukineko White embossing powder on Strathmore Bristol paper and added a punched 1 1/4" circle mask of a Post-it note to create a moon.  I chose to use "tumbled glass" for the lightest colour at the bottom of the card, then "salty ocean" for the mid-section and finally "faded jeans" at the top.  I love the ombre effect this combination created.  I get such a kick out of removing a mask to reveal the resulting effect.  I cut a black silhouette of Santa and his reindeer team using an Impression Obsession die, and mounted it with some dimensional tape.  My finishing touches included a scattering of gold metallic stars and some white dots to mimic tiny stars.

Until then .. .


Sunday, 24 May 2015

Recent Cards From the Georgian Bay Cancer Support Centre

As you may know, I teach card making classes at the Georgian Bay Cancer Support Centre every Wednesday afternoon.  I thought I would show you a couple of the cards that we have made recently.

These are the cards that we made last week:


The first card features the "Love is Kindness" stamp from Stampin' Up, and is coloured with Copic markers.  The background was stamped with the Hero Arts Clings "Friend" definition.  The card base is made from Stampin' Up Strawberry Slush.

The second card was created using the super cute Lawn Fawn stamp set, "My Cup of Tea".  The teapot and cup were stamped with Memento Luxe pigment inks in Morocco and Pear Tart respectively.  Both images were fussy cut and mounted with dimensional tape onto the background after stamping the steam marks, spoon, and sentiment on 110 pound Neenah Solar White cardstock.  The teabag string was slipped through a tiny slit cut with a craft knife under the lid.  A small piece of dimensional tape was mounted under the teabag to lift it off of the pot.  The shadows of the teapot and cup were added with Copic C0 and as a final touch of detail, a generous dollop of Clear Rock Candy Stickles was added to the spoon to look like sugar.  The card base was made with Stampin' Up Early Espresso.  The patterned paper is cut from the retired BasicGrey Indian Summer collection.

I'll show several of the other cards we have made recently at the GBCSC in my next blog post.  Hope you like them.


Sunday, 15 March 2015

Easter Bunnies

I just got home after walking my dog.  It was snowing.  I honestly wonder if Spring will ever come to Midland!  Today is the last day to remove ice huts from the bay - a sure sign of Spring.  I hear that the maple sap is beginning to run and it won't be long before this year's maple syrup will appear in the local stores.  As Spring approaches, I look forward to Easter and getting together with family for a fine feast.

I only made a few Easter cards this year.  I was really pleased with the way this one turned out.  Lots of die cuts in this scene!  It was great fun to put together - I just love lots of details. 


Until next time,

Carol


Friday, 23 January 2015

One stamp Set - Three Ways

I was fortunate to win a beautiful Hero Arts stamp set called "Forever" last fall.  At the time that I won, I had already started making my Christmas cards, so this is the first time I have actually played with it.  I decided that I wanted to use a neutral palette of taupes and browns for my card.  I chose to create my card base out of Neenah Solar White cardstock.  I added a panel of Kaisercraft tone-on-tone patterned paper mounted on a piece of Chocolate Chip Stampin' Up cardstock for the background.  I stamped the tag with Memento Luxe pigment ink in Rich Cocoa.  I just love the distressed look of this stamp and the pigment ink gives a beautiful opaque finish to the stamped image.  I heat embossed the birthday sentiment using Tsukineko white embossing powder.  On the first card, I cut the edges of the tag with my paper cutter.  On the other two cards,  I fussy cut around the tag in an irregular manner to accentuate the uneven, distressed look of the stamped edge.  I mounted the tag onto the card base using dimensional tape.  When it came time to stamp and emboss the butterflies, I decided to try three different looks using different colours of embossing powder.  The first card features dark brown butterflies using Ranger Adirondack Espresso embossing powder.  


On the second card I used Tsukineko White embossing powder for the butterflies on Chocolate Chip cardstock.


The third card features butterflies using Ranger Tarnished Gold and Liquid Platinum embossing powders.  On all three cards, I fussy cut the butterflies and then mounted the butterflies using dimensional tape.


I still can't decide which version I like the best!  

Until next time,

Tuesday, 30 December 2014

Christmas Tag

I'm sorry for my long absence.  Life seems to be getting in the way recently.

I wanted to share some pictures of one of the Christmas tags that I made this year.  I was quite pleased with the way it turned out and the people who received parcels with one of these tags were delighted with them.


I used a Sizzix framelit to cut the tag base and then hand trimmed some patterned paper for the background layer.  I cut the white wicker basket from a piece of 110 lb Neenah Solar White cardstock using a Marianne Design Craftable - Basket and Blooms.  I hand cut a Neenah Desert Storm background for the basket to fill in the gaps in the wicker.  I die cut the poinsettias using Simon Says Stamp's Poinsettia Parade and arranged them so that they looked as though they were filling the basket.  I filled the centres of the flowers with tiny golden seed beads.  The bow was tied with some narrow gold wired ribbon.  I attached the finished basket to the tag using a double layer of mounting tape under the lower portion and a couple of rolled glue dots under the handle.  The sentiment was stamped with an Impression Obsession rubber stamp using Ranger Archival Ink in Jet Black.  Here is a close up showing the dimension of the tag.


I am entering this tag in the "Anything Goes" Simon Says Stamp Wednesday Challenge.

Wishing you all a very Happy New Year full of happiness, good health and prosperity.

Until next time,


Sunday, 28 September 2014

Online Card Class: Copic Markers for Card Makers

I'm busy taking another of the wonderful Online Card Classes.  The latest class is Copic Markers for Card Makers.  Each day several videos are available that teach new techniques using Copic Markers.  We have been given a set of practice sheets to do our "homework".  Here is one of the practice sheets that I completed:


The practice sheets have been lots of fun.  They certainly help hone your colouring skills using Copic markers.

Until next time,

Monday, 25 August 2014

Wetlands

I recently purchased the "Wetlands" set from Stampin' Up.  I just love it!  When I first saw this set, my son had just been involved in a study of the Piping Plovers that have returned to nest at Wasaga Beach.  This species had been extirpated from the Great Lakes area for over 70 years, so there was a lot of environmental excitement when they successfully nested in the area.  The little sand pipers in the Wetlands set reminded me of them.  The set contains some terrific sentiments as well as a wonderful Canada Goose, the sand pipers, and a very versatile grass stamp.  My love of watercolours continues, so I created a watercoloured background before stamping on the goose and grass.  The sand pipers were a perfect accent on the envelope.


I double matted the finished watercolour piece, first with black and then with a craft coloured piece of cardstock.  I trimmed the mat with my hand held Purple Cow mouse, using the deckled edge blade.  Next I burnished the edges of the cardstock with some bronze metallic ink.   I mounted everything on a black card base.  I used some natural jute twine from May Arts to tie a multi-strand simple knotted embellishment.

Until next time,


Friday, 8 August 2014

Stretch Your Stamps 2 - Day 1

As you know, I'm in love with Online Card Classes.  I'm currently participating in a new class called, "Stretch Your Stamps 2" and I'm having a great time.  There are tons of terrific ideas.  Here is a card that I tried after watching Shari Carroll's wonderful video.


I created the card using a Hero Arts background stamp called "Large Fabric Design".  I applied random blotches of Distress Inks to my craft mat and gently squished the stamp into the ink.  Next I sprayed the stamp with Sheer Shimmer Spritz and stamped the image on Strathmore 140 lb watercolour paper. When the ink had dried, I cut the watercolour paper into 1 inch squares.  In order to give the squares more definition, I inked the edges with some Dark Moss Colorbox Chalk Ink.  I mounted the squares on a panel of Neenah white cardstock.  I added a bow made from some seam binding ribbon which I had died with Vintage Photo ink and scrunched before allowing it to dry.  I glued several die cut "hello" pieces together, which were cut from watercolour paper and a dark brown piece to form a shadow effect.  I finally mounted the panel on some Candy Necklace Bazzill cardstock.  As a finishing touch, I painted a few woodcut butterflies with some Distress Stain Picket Fence and mounted them on the card.  I was pleased with the finished result - hope you like it too!

Until next time,


Wednesday, 9 July 2014

Art Impressions Front-N-Backs

Recently, I've had great fun playing with an Art Impressions stamp set, "Little Behind"It features an adorable fat cat with an endearing grin.  The front end of the cat is affixed to the front of the card base, while the back end of the cat is mounted inside the card.  To make things just a little more interesting, the set includes a wobble spring to make the kitty's rear end jiggle when the card is opened.  Such fun!  The cat's front and back were stamped with Jet Black Archival ink on Stampin' Up Smoky Slate cardstock and then added colour using my Prismacolor Premier coloured pencils.  I chose to make it look as though the cat was hanging through an open window by using another Art Impressions stamp which shows a rustic, shuttered window.  I cut an opening through the front of the cardstock and the windows so that you can see through to the inside of the card.  I also chose to add a bit more texture and dimension by adding a window box of flowers under the window sill using the Memory Box small window box die.  I stamped the greeting "hello" using a Simon Says Stamp Handwritten Borders stamp.  As finishing touch, I added some white faux stitching around the edge of the card with a Sakura Gelly Roll pen. 


I just love the greeting that is included in the "Little Behind" stamp set.  It is perfect for a belated birthday card.  Those who know me best know that I tend to run on what my son and husband call, Carol time, so "Always a little behind" is a very appropriate greeting from me.  I used another handwritten border stamp for the happy birthday sentiment and added the word "belated" from an Impression Obsession "Life Stuff Sentiments" stamp set.

 
 Thanks for visiting!  

Until next time,


Thursday, 22 May 2014

Watercolor for Card Makers

I have mentioned before that I am a huge fan of Online Card Classes presented by Jennifer McGuire, Kristina Werner, and friends.  You only have to check out all of the participation badges that I display on my blog to see how much I have enjoyed taking part in these classes.  They are great fun, an amazing source of information regarding card making techniques, and provide an infinite supply of inspiration.

Their latest online course has been Watercolor for Card Makers and I have thoroughly enjoyed watching all of the wonderful videos and soaking up all of the inspiration.  I just wish I had been able to have a bit more time to play and make cards using the skills that have been presented.  I find that I often end up with a dozen or more unfinished cards while taking part in the classes, and don't get around to finishing them up until the course has concluded.  Well, here is one of the cards that I did manage to get finished.


 I made this card following the Day 9 class on Freehand watercolour techniques.  I have never attempted watercolour painting prior to this course and I have to say I enjoyed it immensely.  I really want to further explore and play with this medium.  It is so much fun and I had a real sense of accomplishment when I finished this card.  I used Peerless Water Colors on Tim Holtz watercolour paper to create this card.  I am so thankful to Jennifer McGuire for introducing this form of watercolour supplies - just love them!  The paints blend beautifully and have gorgeous vibrant colours.

Until next time,


Saturday, 26 April 2014

Easter Tags

Although I know that Easter is over, I wanted to share some pictures of the Easter tags that I made to accompany my Easter gift bags.  The base for each tag was die cut using the Mama Elephant Embellished Tag.  I just love the stitched border on this die.  The bunnies were cut using the Bunny Set of dies by Impression Obsession.  I built the background of the first tag using several dies by Memory Box including the Lavish Branch, Grassland Border, and the Grass Border by Impression Obsession.


The tiny blossoms were made with the Flower Mound by Memory Box.  I formed them with my stylus and my Pergamano mat.  The tiny butterfly was cut with the Butterfly Delights die by Memory Box and the tiny heart was cut with the Heart Delights also by Memory Box.


To build the background of the second tag, I used snippets cut with Memory Box's Grand Alder Tree and Honeysuckle Vine for the greenery.  I used Tiny Tulips by Memory Box for the tulip plant and a tiny bird cut with a die by Impression Obsession.  The Happy Easter greeting is from the Lawn Fawn stamp set of the same name.

Hope you like them.

Until next time,


Saturday, 8 February 2014

Cheery Hello

I have a good friend who is currently battling cancer and recently started chemotherapy.  From personal experience, I know how challenging this can be.  I wanted to let her know that I'm thinking of her and also to send her a cheery hello to brighten her day.  After seeing a "Card in a box" tutorial online, I decided to give one a try.  Here is the finished result:


I was really pleased with the way this card turned out and my friend seemed to like it too.  I used a variety of Stampin' Up floral stamps to create the bouquet of flowers that I embossed with white embossing powder on several different colours of cardstock and small print patterned papers.  I also stamped a leafy shadow stamp on some blue-green coloured cardstock (Bazzill "Rain") and embossed it with clear embossing powder to add some depth to the colour and some shine to the bouquet.  The tiny hearts that I scattered throughout the bouquet were cut using the "Hearts Delight" die by Memory Box in white, coral and pink.  I used my Wink of Stella clear glitter brush to add some sparkle to some of the hearts and coated others with Glossy Accents.  Because of the scattered hearts on this card, I'm entering it in the Simon Says Stamp Wednesday Challenge,  "Have a Heart"

Here is a close up of the card details:


One of the really cool things about this card is that it folds down flat in order to place it in an envelope.  The finished dimensions were slightly wider than a regular A2 only because I allowed some of the flowers to extend out to the sides.  I had no trouble fitting it into an A7 envelope.
 
 Until next time,

P.S. - I sure wish the groundhog hadn't seen his shadow - I'm ready to see some signs of spring!